
DIGIPAK CONSTRUCTION


To start the front cover of the digipak, I created a new document in Photoshop with the ratios as "Width: 1000 pixels", "Height: 1000 pixels" and "Resolution:300 pixels/inch". This would give me the exact size for the front of an album/digipak. We then filled in the background with a subtle grey.
We imported the image that we was going to use and re-sized it to fit the dimensions of an album cover.


I put the layer blending mode to soft light so that the image would merge the grey background.

We duplicated the images twice with three layers of the image in total. On the second duplicated layer, I changed the opacity to around 67%.


On the last duplicated layer, I added a layer mask by pressing the "add layer mask button" at the bottom of the layers window. I made sure that the foreground colour was black and pressed alt and delete to fill with black with the layer mask. This made the duplicated layer disappear because now the layer mask was filled with black.

Then I created a new group and called it "Adjustments". This is where I put all of my colour corrections in. I made sure that thisg roup was on top of all the other layers. FIrst of all, I went to Layer > New Adjustment Layer > Hue/Saturation and reduced the saturation to minus 70.
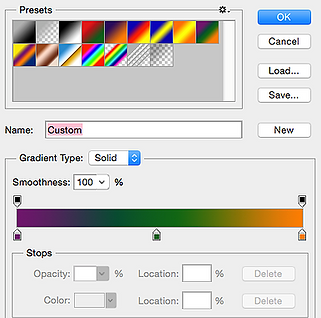
After this, I added a gradient map layer going from purple to green to orange. I set the layer to overlay and changed the opacity to 30%.
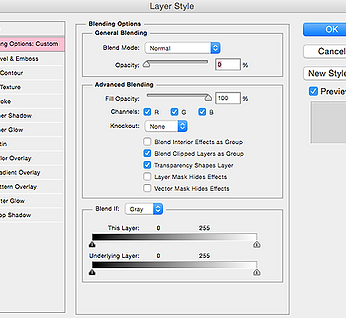
I created a new layer and filled it with a random colour. I right clicked on the layer thumbnail and selected Blending options. I reduced the fill opacity to 0%.


Following on from this, I added a gradient overlay going from pink to yellow to blue. I clicked on the arrow at the top of the colour picker and selected the opacity of each colour. I reduced the values to around 30% so that the effect was softer.
I added the text "London Grammar" and "If You Wait" in the font, Miminal, from dafont.com. Then I added a new layer and filled it with black. I then went to Filter > Render > Lens Flare and selected the 50-300mm zoom. I pressed Command T and turned the lens flare to where the sky is/where the sun would be on the image.
Finally, I added a grunge layer over the image and reduced it's opacity to around 40%. Then I placed the text on top and the front cover of the digipak was created.
Digipak - Front Cover
Inside - (Booklet)

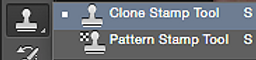

I followed the exact steps to the front cover in terms of the effects. However, the dimensions and images changed. I had to clone the brick wall in the background as the image was not long enough to fit the inside of a digipak. I used the clone stamp tool to do this and selected samples from the other side of the brick wall.


CD Disk


I followed the exact steps to the front cover in terms of the effects. However, the dimensions and images changed.


I added a CD template onto the image where I had already added the effects like the front cover and inside of the digipak.
I scaled the CD template to what part of the image I wanted to have on the CD and reduced it's opacity to around 30-40%.


Then I cropped the image up to the CD template and removed the background. I then turned it's opacity up to around 60%. This left me with the image on the CD.
After this, I added the same font from the front cover and inside onto the CD. I added the record company's logo of London Grammar too.
I imported other elements onto the CD as they were typically found on CDs. I had to add the copyright information onto the outside of the CD as this was common. I did this by creating a path using the tool on the left and typically drew a circle the size of the CD. Then I typed the information and finally, the CD was created.
Back Cover


I followed the exact steps to the front cover, inside and CD in terms of the effects. However, the dimensions and images changed


